Today's Open/Close Times based on tide predictions

DateClub TimelineSunsetLow Tide
Wed Dec 6 Noon to 4:21 PM4:51 PM2.2 @ 1:33 PM

red means the Club will be closed. Note that current low tides are around 0.1 feet lower than predictions.

Day Leader's WhiteBoard

Whiteboard

Unless whiteboard shows today's date, there is no Day Leader or they haven't signed in yet.

Rigging a Bahia's Reefing Line


I've had to correct mis-rigged Bahia reefing lines recently, so I thought I'd explain how to rig the line properly. You'll have to do this if the main sail is crunched at the leech when you raise it fullly or if you can't fully reef the sail.

It's a little confusing, as it's two lines in a "jiffy reef" system, so that you only have to pull on one line to pull down both the luff and the leach of the sail. But once you get the picture, it isn't that hard to deal with. Here's what it looks like:

The line through the leech of the sail attaches to a block in the boom. The line through the luff of the sail runs through the block and back out the forward end of the boom through the cleat.

So what happens when you reef is this. You pull on the line at the forward end of the boom. This pulls the block attached to the leach line forward through the boom, pulling the aft reefing line down and raising the boom to the reefing gromet. You get here:

At this point, the block is as far forward as it can be in the boom, so pulling more on the reefing line pulls the luff reefing line down to the boom (you ease the halyard as you do this). So you get to here:

Continue reading

Slow Sailing

b2ap3_thumbnail_Slow-Sail-to-Buoy.jpg

Slow sailing is a Junior skill and an important one. The objective of slow sailing is to get to a fixed point in space (a dock, a man-overboard,
a buoy) with zero speed. The idea is to come in on a close reach course, where you have an accelerator and a brake.
With the mainsheet all the way out, the sail is depowered, and the brake is the wind and sea against the boat. Pulling in the mainsheet on the falls is the accelerator. You line yourself up on a close reach
course and sail to the target.

There are two skills involved:

1) lining yourself up on a close reach course to the target, and

2) slow sailing on that course to it.

Let's talk about hitting a buoy at zero speed, as it's the hardest of the maneuvers. When you dock, you usually have some room for error, as you don't have to get to a precise point on the dock. But wait, what about a busy Saturday where you have to thread the needle between the only two boats where there's any space between them to dock? If you can lightly touch a buoy on a slow-sail, you can do precision docking.

Continue reading

Sailing Small Circles

Sailing Small Circles
b2ap3_thumbnail_Small-Circles-Ideal-Circle.jpg

Small Circles

This is one of the most difficult Junior skills, and it's quite important. But why is it important? In real life, how many  small circles are you going to do? Probably none, after you pass the Junior Test. But you probably will need to do fast turns upwind or downwind, and do fast tacks and gybes, possibly to avoid disaster (like hitting something). And maybe with newbie crew. Think about approaching the dock on a big south wind and getting turned in the wrong direction (like into the sea wall). That's what this maneuver is about. You may never do another full circle in your life, but you may need one or more of the maneuver's components.

The maneuver is also a stress test of your sailing skills. You have to do a bunch of things quickly and competently without time to think - they have to be instinctive. It's also a stress test of your crew communications skills for the same reason.

A real circle?

First of all, it's not really a circle. We think of it as looking like this, here counter-clockwise around a buoy:

Continue reading

Demystifying Apparent Wind - Part 3

b2ap3_thumbnail_Apparent-Wind-Downwind.gif

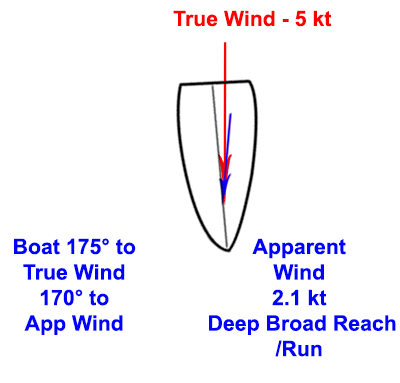
The last in the series - Apparent Wind downwind.

It's hard to steer downwind. The waves toss the boat around more, and if you get tossed too much, you'll gybe when you don't want to. You can capsize on a broad reach in heavy winds and seas.

The biggest thing you have to deal with is apparent wind. On a downwind course, small changes in course, wind speed, and wind direction produce large changes in apparent wind.

We'll use the same 5 kt. true wind we've used before and the same Bahia-like boat. You're almost dead downwind - just 5 degrees short of it. Here's what it looks like:

Continue reading

Demystifying Apparent Wind - Part 2

b2ap3_thumbnail_Apparent-Wind-Puff---Close-Hauled.jpg

Last time, we looked at apparent wind and how it changes as you change point of sail. In that discussion, the speed and direction of the true wind was the same and the boat direction changed. Here we look at what happens when you're keeping the boat course the same, the wind direction doesn't change, but the wind speed does. It increases (a puff) or it decreases (a lull). You get both of these as you're traversing the Novice Area on a normal day (westerly winds), as the trees and gaps between them on the breakwater to the restaurant cause this uneven wind.

Again, we're using our Bahia-like dinghy and a 5 kt. wind. You're sailing close-hauled, so it looks like this:

The boat is 45 degrees to the true wind, but only 30 degrees to the apparent wind. Normal. Then you get a puff, say a pretty big one (10 knots, double the speed but out of the same direction). In that instant, your boat speed doesn't change (it needs time to do that), but your apparent wind does. It looks like this:

Continue reading

Demystifying Apparent Wind - Part 1

Demystifying Apparent Wind - Part 1
b2ap3_thumbnail_Apparent-Wind---Close-Hauled.jpg

A very common problem my students have voiced is that they have trouble figuring out where the wind's coming from. On the one hand, it shouldn't be so hard - turn your head and feel the wind on your ears. When it's the same on both ears, you're either looking straight into the wind or straight away from it. Or (less accurate) look at the yarn on the side stay.

Yet it's not so simple. You think of the wind as coming from the same direction, but when you sail, it doesn't seem to do that. It seems to shift a lot. And "you told me we couldn't sail higher than about 45 degrees into the wind, but that yarn on the stay has a much smaller angle than that". And (yet more observent) "We're sideways to the waves, so we should be on a beam reach, but the yarn says we're still somewhat upwind".

Welcome to the world of apparent wind. This is a simple concept to explain and  understand at a high level, but very hard to get at a detailed level. Everyone gets the simple explanation - you're peddling a bike at 10 knots on a calm day, what do you feel? A 10 knot headwind. The speed you're generating adds to the wind speed to create the wind you feel, the apparent wind. The apparent wind is what you and the bike feel. Peddaling 10 knots in a 10 knot headwind, and you're pumping against a 20 knot apparent wind. Doing the same in a 10 knot tail wind, and Bob's very much your uncle.

Those with a math background easily grasp that this is a vector algebra problem - the boat wind speed adds up with the true wind speed as vectors, where both the speeds and the directions interact. But even if you get that, it's truly hard to see how it all plays out on the water. And I'm speaking as someone with a graduate education in mathematics. In editing this blog, I realized that I had messed up a calculation in my first draft. If you sit down to do the calculations, you have to determine what your boat speed will be at a given true wind speed and point of sail (angle of the boat to the wind). Polar performance diagrams will show this, but good luck finding these for any of our dinghy's.

So my point is that it's quite difficult to build a mental model of this. Instead, you can get a feel of how it happens on the water without trying to understand why, exactly. I did the math from a guess of a polar diagram for a boat similar to a Laser Bahia at 5 knots wind. If you're not racing, it doesn't matter how accurate this is. But it should be pretty typical.

Continue reading

Teaching Upwind Sail Trim

Teaching Upwind Sail Trim

We have a teaching philosophy that is unique. Most sailing schools will do a "ground school" for hours before the students get on a boat. The idea is to explain how it all works, so the  student is prepared intellectually for the experience. Our approach is to get them on the water right away and have them just do it - steer the boat, tack, and get the feel for it.

I believe that our approach is correct, up to a point. You need some practice before the sailing theory makes any sense. And my experience as an instructor is that a beginning student will do just fine steering beam reach, tacking, even steering close-hauled without any discussion of how it all works.

The turning point is when they try to control the tiller and the main sheet at the same time. Lots of confusion, including understanding wind direction. Tacking from beam reach to beam reach and seeming to lose the wind (because the sails are trimmed too tightly).

This is the point where they really need an understanding of how it all works. And that's hard to do on the water. You  need an image to show how it works. I believe it's all pretty simple (or at least
can be explained simply), with a visual from above.

The key concept is that upwind (beam reach and higher) the sail is a wing, it works just like the wing of an airplane. Now an airplane wing has to be at a certain angle to the wind, or it doesn't work. Same with a sail. So when you're trimming the sail going upwind, you're keeping the sail at the same angle to the wind all the time.

Let's see what this looks like from above on several points of sail - close hauled, close reach,  and beam reach (click on the diagram to start the animation):


b2ap3_thumbnail_Sail-Trim.gif

Continue reading
Tags:

Docking in Low Tide

Docking in Low Tide
b2ap3_thumbnail_Low-Tide-Docking.jpg

I posted while ago on launching in low tides. The idea was close attention to sail trim. The common mistake is to over-sheet the main leaving the dock, and even with full centerboard you'll drift sideways into the Cal Adventures dock.

Here I want to talk about docking in low tide. 

There are several problems. One is recognizing that it's low tide. It's easy going out with a "fresh" boat (you push the centerboard/rudder down and feel the mud, so you bring it up a few inches). But coming back you have to recognize and plan it. My rule of thumb for Bahias is that a tide of under +2.0 means you have to raise the centerboard and/or rudder. Plan for it, and raise both on the way in. When it's all the way down, the centerboard is about a foot lower than the rudder fully down, so you can adjust the two differently.  In very low tides, the rudder will be just below the water, horizontal. It will work, but it will be very  hard to use, and hard to turn quickly. Also, the stress on the rudder when it's parallel to the water surface is in a direction it's not designed for. So it's best to limit the amount of time you sail with the rudder in that position.

You will find that the boat handles differently with the centerboard up (or raised above the normal, fully down position). An important thing in docking is that the pivot point of the boat is farther aft, which means that where the boat actually turns in the water will also be farther aft.

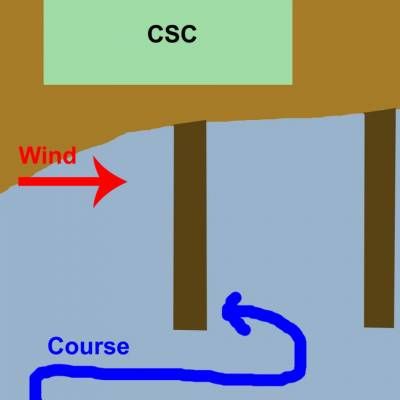
The dock approach will be different in low tides. You can't use the standard "come in on a beam reach and slow sail to the dock". Your leeway with the centerboard up will be too much. Even if you aim for the south end of the dock, you'll be lucky not to hit the sea-wall (painful personal lesson here).

Continue reading

Right-of-Way Trivia

b2ap3_thumbnail_Backwards-Right-of-Way_20150608-035246_1.jpg

I love trivia. Probably my age, or my geek background.

When I go over right-of-way rules with students, I tell them this is a trick question. Sailboat and kayak - who has right of way? Any answer they give is wrong, although it's interesting to see the reasoning behind it (kayak more maneuverable, etc.), and that in itself is useful - on the water, what would you do?. The answer is that it's not covered in the Naviagation Rules. Really. I was a kayaking instructor for 10 years, and in a moment of boredom, I read the entire Navigation Rules looking for things that applied to kayaks. Exactly one reference:

Rule 25 - Sailing Vessels Underway and Vessels Under Oars 

(ii) A vessel under oars may exhibit the lights prescribed in this rule for sailing vessels, but if she does not, she shall exhibit an all around white light or have ready at hand an electric torch or lighted lantern showing a white light which shall be exhibited in sufficient time to prevent collision.

Not useful for right-of-way. O course the generic any vessel rules apply to a kayak (sailboat overtaking a kayak, or for that matter a slow moving powerboat, must give way).

Continue reading

Advanced Boat Handling - Another Great Advanced Dinghy Lesson

Advanced Boat Handling - Another Great Advanced Dinghy Lesson

The Advanced Dinghy lessons this year have been uniformly great.

This week's was no exception - boat handling by Jonas Kellner, a club member who's been sailing for over 30 years and teaching sailing and racing for almost as long.

Someone asked Jonas before the class whether he'd be teaching racing tactics. He said that he could, but knowing the best tactic for a given situation is useless if you can't execute the maneuver. He'd be focusing on the latter.

We had a pre-sail briefing, where Jonas explained what we'd be doing. 8 exercises around a set of buoys in a line perpendicular to the wind (so basically beam reach). The first and last exercises were slalom course, where we were to keep as tight to each buoy as we could.

The intermediate exercises were ovals around the set of buoys (counter-clockwise in all cases). They were technical exercises, designed to improve boat handling skills:

Continue reading

Advanced Dinghy Lessons Start with a Bang!

Philippe on the subject of sail trimming and especially use of the gnav (according to him, an under-used tool).

Philippe is an an incredible sailor and an amazing instructor.  We spent about half of the time on land with an RS Venture looking how the various sail controls affected sail shape and talking about what sail shape you want for what conditions (it was blowing over 15 kt. this evening, by the way, with pretty big seas - we  had a lot of weight on the boat on land to make sure it didn't capsize into the cars parked near the clubhouse). On land, it was much easier to see the effects of various controls on the sail shape.

This is my lesson summary (feel free to comment):

Scope: Dinghies which generally don't have travelers.

  1. Sail shape is very important. The usual things about depth and power, and location of sail draft. With lighter winds, you want a fuller sail and a draft a bit aft. With heavier winds, you want a tighter sail and a draft forward.
  2. In heavier seas, you want more power, even with stronger winds.
  3. Tensioning the Cunningham brings the draft forward.
  4. The outhall affects the lower third of the sail.
  5. Several controls bend the mast aft, which tighten the sail and move the draft forward. Tightening the mainsheet and the gnav do this.
  6. In high winds, you don't want the boom near the center of the boat, as the lift from the sail is mostly sideways to the boat. But just easing the mainsheet induces twist in the sail. Tightening the gnav overcomes this, allowing the mainsail to go to a better angle, but preserving the sail tightness.
  7. Bearing off from close-hauled, you want to do several things.  One is ease the mainsheet. Another is to keep weight on the windward side to help turn the boat downwind. A third is to ease the gnav (and then tighten it when on course).
  8. Gybe-ing:
    1. Blow the gnav before the gybe (this will depower the sail and cause the top of the sail to back-wind before the bottom of the sail, producing a gentler gybe).
    2. Weight the boat to windward to turn it down-wind through the wind. If you reach across to pull the boom across, you'll mess this up.
    3. If done correctly, the wind will gently pull the mainsail across. Grab the sheets as this happens to buffer it.
    4. Power up after the gybe by tightening the gnav

Then we went out and did it, both upwind and downwind. And it worked. I was prepared for hikiing really far out with the winds we had, but we didn't have to. And it was amazing how gentle the gybes were with this technique. Note that in bearing off and gbye-ing, you're doing what you would do rudder-less - moving weight to turn the boat. After the class, I discussed that with Philippe, and  his opinion (as a racer of some renown) is that the more you can use your weight to  maneuver the boat, the better (i.e. faster) you'll sail.

Continue reading

Man Overboard on Dinghies

b2ap3_thumbnail_MOB-Broad-Reach.png

There are at least 4 ways of doing this, and all of them have their advocates  (which means that there are advantages and disadvantages of each, and each is optimized for different circumstances). 

I think most instructors at the Club teach the Broad Reach (or Deep Beam Reach) procedure.

1. Immediately go to a Broad Reach
2. Sail for a small number of boat lengths (it doesn't matter how many, just get far enough away from the MOB to give you room to maneuver and sail back)
3. Tack around, furl the jib
4. You're on a close reach, slow-sail to the MOB

Advantages:

Continue reading

Low Tide Launching/Docking

Low Tide Launching/Docking

We've all experienced this, either as sailors or instructors.

You're going away from the dock, parallel to it, but somehow you're getting pushed sideways into the middle dock. Or you're docking, and you have a huge amount of leeway, pushing you into the seawall.

What I learned in the Advanced Dinghy class from Yves is that it's all about sail trim. Even with the centerboard completely down, you have a huge sideways force if you oversheet. Not only is the sail not as efficient as it could be, but the force is more sideways than forward. With the centerboard up (for low tides), the effect is worse.

This is the season of rip-roaring tides (it can go from more than 6' at noon to negative '1 at 6 pm, and the dock time has been as early as 3:30 some weeks).

Thanks to what I learned from Yves, I've been doing the following in my lessons when we had to dock with less than full centerboard. As soon as we get away from the dock, I raise the centerboard, and we sail, completely focused on sail trim. Jib is easy, mainsail more difficult (but more important). I try to get the students completely focused on sail trim. I tell them "They'll tell
you that you can't tack without a centerboard, but they're wrong" after they've tacked without a centerboard.

Continue reading

Main Sail Trim by the Tell Tales

Main Sail Trim by the Tell Tales

There's a great book called Mainsail Trimming by Felix Marks that goes into this in great detail. A lot of it doesn't apply to dinghies (travelers, for example). But one thing does - trimming the mainsail using the mainsail telltales.

The telltalls are on the leech (back edge) of the sail, and when sailing upwind from a beam reach  and forward (when the sail is a wing), the tell tales should be streaming, just like both of the jib telltales. But what if they aren't? For the jib telltales, we have the guidelines "move the sail toward the telltale that isn't streaming" or "move the tiller toward the telltale that isn't streaming", and students seem to get that. But I don't think we talk enough about trimming the mainsail using the telltales (I could be wrong here, just my observation).

So (on a beam reach and above), if the mainsail telltales aren't streaming, they're curling to one side--windward or leeward. That's just like one of the jib telltales not streaming while the other one is. Move the sail that direction (as in, ease out if streaming to leeward and trim in if streaming to windward), or move the tiller that direction. Essentially the same thing as you would do to trim the jib.

I've seen a tendency in students to oversheet the main, so I think it's useful to sensitize them to this, and the mainsail telltales are one way to do this.

You can also use the mainsail telltales in a gybe. I went on the water once with Stefano Maffuli and a friend of his who had been head instructor at St. Francis Yacht Club (grazie, Stefano). He said that the mainsail telltales were the best indicator of when to pull the main across in a gybe. They show exactly when the main is back-winded--a much better signal than the jib coming across.

New Photo Gallery - How to Upload Photos

We now have some actual sailing photos in the gallery - the Richmond Bridge Cruise from last weekend.

So how to you get a gallery established and upload photos? Easy, send an email to smugmug@cal-sailing.org (right now, that's me). I'll create the gallery (and a new folder, if necessary - we're figuring out how to organize these over time). I'll send you a link you can use to upload the photos. You can pass the link on to others, if there were multiple photographers for an event. the upload process is pretty easy.

What is less easy is attaching Captions and Comments to the images. There are two ways to do this:

1. Before you upload the images. You have to use an image editor to insert the Captions and Comments in the image metadata. Specifically you edit the IPTC Core metadata, setting the Headline to what you want the Caption to be, the Description to what you want the Comments to be, and any Keywords you want. I use Photoshop Bridge to do this, but there are other editors, some of them free.

2. If the above made no sense to you, just send me the captions and descriptions you want (by image number in the gallery after you've uploaded them), and I'll insert them for you. After the images are uploaded, only a site admin can do this.

New Photo Gallery

We've changed our Photo Gallery from Flickr to SmugMug (you can also get to it as usual by clicking on Gallery on the Main Menu). This change allows us to organizes the photos better - there's a hierarchy of folders with the photos ultimately in Galleries. Right now there's just one Folder - Training Events, and one Gallery - First Aid and CPR - April 19, 2013. But we will be adding to that. It will also be easier for members to upload their photos for events. 

When you bring up SmugMug, you'll see the 12 most recently uploaded images. Scroll down, and you'll see the folders.

You can download full-sized images from SmugMug by clicking on the image to make it full screen, then right-clicking on the image and selecting "Save to File". 

We will be moving the photos from the old Flickr site to SmugMug over time, as we don't want to lose them.

Update from Stephanie on the Clipper Site - Day 21

Clipper Site

Another Update from Stephanie on Clipper Site

Clipper Update

Update from Stephanie on Clipper Site

Check it out on the official Clipper Race's site.

My First Advanced Dinghy Class

The first class was last Monday (after the time change), and it will run through September with a couple of holiday exceptions from 6 pm to sunset. Jennifer Kroon is organizing this and occasionally teaching, as she did in the first class.

We had 7 boats and 14 sailors. We did what Jennifer called warming up on our sailing skills. We were going to do a version of Ultimate Frisbee on the water, but the frisbee didn't float, so we did other things. We sailed several courses around  4 buoys (the goals for the Ultimate Frisbee) in a line (one boat after the other, a boat-length between each and the one following). Sounds easy, right? Not so easy with crews of different skills. So the lead boat can't get too far ahead, and the other boats have to do what they can to catch up. And sometimes the instructions aren't so clear, so there's a built-in chaos. And then the lead boat is told to set whatever course they want, and the other boats have to follow. Preferably doing a lot of tacks/jibes.

The theme of the exercise was right-of-way. In this relatively simple exercise, right-of-way situations are set up, and you have to deal with them. I failed on this. I was on starboard tack going into two boats, one on either side, both on port tack, and one on a collision course. I had no room to maneuver. I called "starboard", but the other boat didn't respond as quickly as I might have liked, so I moved to avoid him. The classic mistake. We both moved first one way then the other trying to avoid each other and eventually collided. I can't count how many times I've described this situation to my sailing students and how to deal with it, but when it happened to me, I punted. There's an Italian expression that describes this "tra il dire e il fare c'è di mezzo il mare" which basically means  “it's one thing to say it, and another thing to actually do it.” A learning experience, which is why we're all here.

Even these relatively simple exercises are much more difficult than anything you would do on your own, so they really hone your skills.

Jennifer talked a bit about the class. It's not going to get you to Senior by itself, but it's going to help you get there by improving your skills. She talked about the Senior test and the importance of judgement. Think about how you would handle an unconscious man overboard. There is no right answer, but there are wrong answers.

Continue reading
Tags: